
Sawdust
 I have been interested in woodworking since I got out of high school which was quite some time ago. My first woodworking project was in the shop of my friend’s father. I built a corner cabinet for my wife-to-be as a wedding gift. As I think back about that, I recall that everything in his small shop was coated in sawdust. I started accumulating woodworking equipment as soon as we got married and I had a place of my own. One of the issues that anyone who has a wood shop deals with is sawdust. Until several years ago I did just that, dealt with it. That meant dust in the air, dust on the floor, dust all over my tools and dust being breathed in by me. I decided it was time for me to make the investment in both money and time to implement a dust collection system in my shop. My shop is a hobby shop and while I have some decent equipment that is great at generating dust, I was also not interested in spending an absolute small fortune on a dust collection system.
Planning
Dust Collection Layout
As with most successful projects, the amount of time spent before any work takes place is typically time well spent. I started reading articles on shop dust collection and purchased a Woodshop Dust Control how-to book from Amazon. I like to do my research to limit the number of mistakes that I know I will be making. Deciding what vacuum system I would be using, the type and size of piping, the blast gates, and the list goes on.
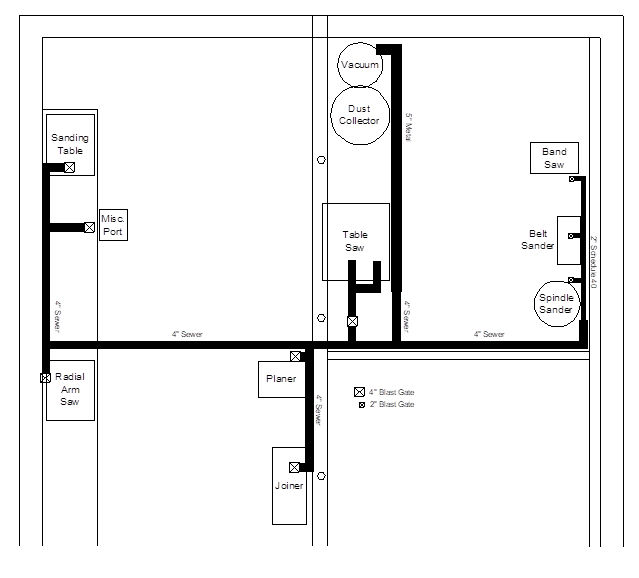
I also needed to determine how I would make the final connections to all of the equipment that I planned to include as part of the system. Lastly I realized the need to draw up a system layout to figure out where I would run my lines to gather the dust. This helped with selecting the piping and fittings as well as figuring out where I could actually physically route the piping in my shop. My layout is shown here.
The Dust Collection Engine
Engine of Dust Collector
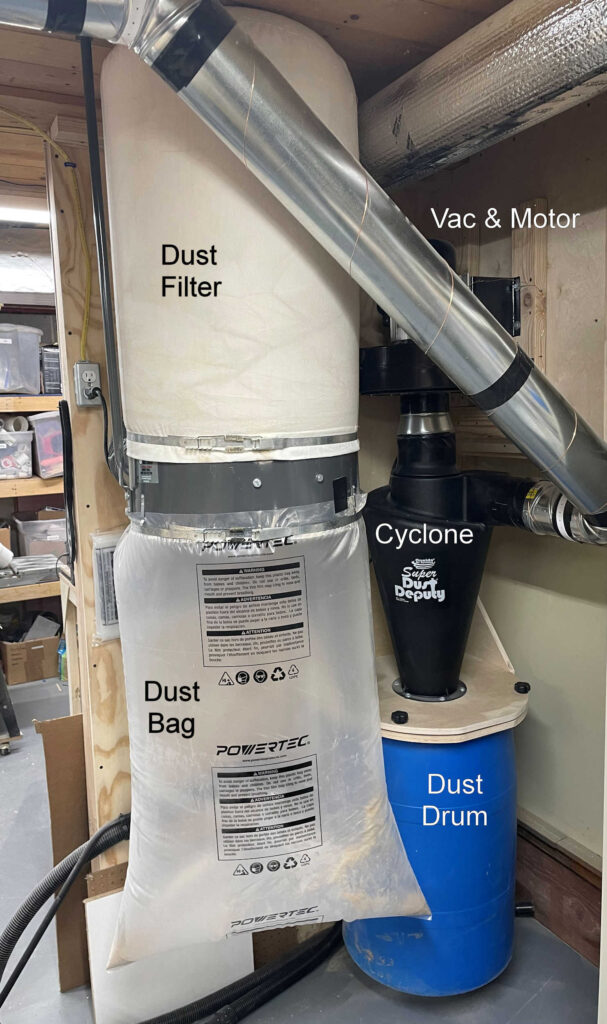
After some initial research I saw that many fellow woodshop hobbyists were building their systems around the 70 gallon, 2HP dust collection system from Harbor Freight. I know what some of you are already thinking, but hear me out, this thing really works well as the muscle behind the dust collection system. That is not to say that I used the system as presented out of the box. That would be way too easy.
From a previous dust collection vacuum project in my shop I had experience with cyclone dust collectors (I will detail that in a separate post). These clever devices spin the dust and air such that the dust drops out of the bottom of the cyclone which keeps most of that dirt from clogging up your air bag and/or filter. I went with the Oneida 5″ Super Dust Deputy . This meant a total modification to the Harbor Freight dust collector as well as devising a removable container for the dust collected.
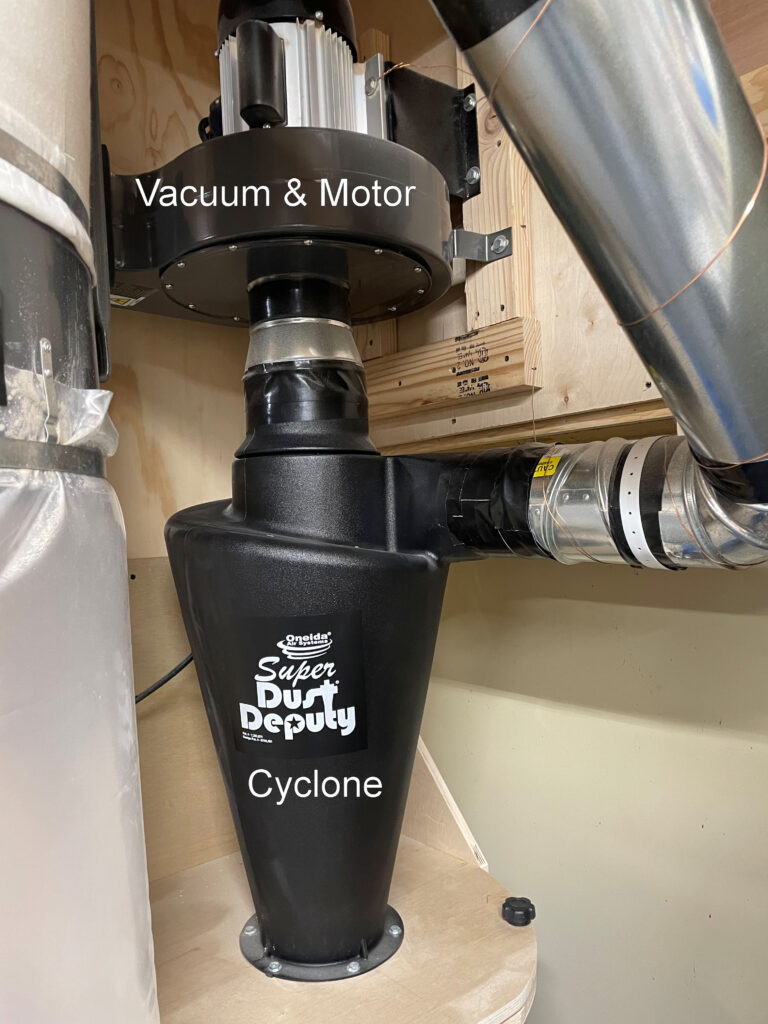
Dust Deputy Cyclone & Vacuum
The system does a great job of putting 99% of the dirt in the blue collection drum. The dust bag does not start accumulating dust until the drum is close to full. The dust filter is a bag that allows air to escape while trapping the larger particles of dust. In some cases I have seen where this bag was replaced with a large filter with an exhaust that leaves the shop thus eliminating even fine dust particles from the shop.
Connecting all of these devices together was a bit tricky given none of them seemed to have the same diameter opening. After a few trips to Lowe’s and Home Depot I was able to come up with the fittings needed.
I also needed to come up with some sturdy methods to mount the motor and blower given they were no longer a part of the original cart and are rather heavy. Be sure to use multiple lags, heavy washers, and have a firm mounting location. The Dust Deputy and plywood/drum assembly are held up with a rather strong plywood bracket assembly in my shop.
The dust collection barrel was a used 30 gallon poly drum I got from a friend. If you don’t have a friend with a poly drum laying around, you can purchase them on Amazon but would probably be better served to find one locally. I cut out the top lip of the drum and then cut out a piece of plywood the shape as shown. Using a router, I routed a groove into the bottom of the plywood to match the top lip of the drum. I filled the groove with silicone, placed the drum into the groove, and then screwed the drum to the plywood. The plywood/drum assembly is matched up to the upper plywood assembly. A short wooden brace holds the weight of the back of the plywood/drum assembly while 2 screw knobs and threaded inserts hold the front of the unit. Remove those 2 knobs and the plywood/drum drops down for emptying.
The Piping
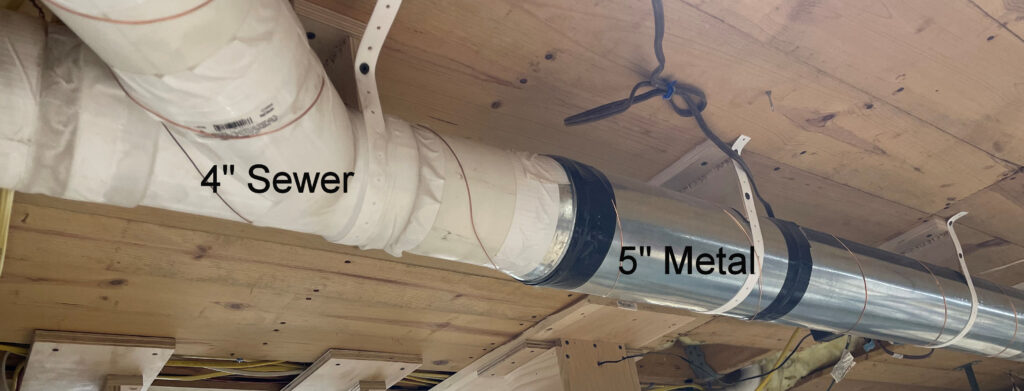
Piping Detail 5″ to 4″
The next part of the project involved the tentacles of the dust collection system. At this point I had a dust collection system hanging on my wall with no means of moving the dust from my tools to the blue dust drum. In looking at the recommended pipe sizes from my dust collection book, I decided to construct my main trunk out of 5″, 26 gauge steel vent pipe. Do not make the mistake of going with a lighter gauge as the vacuum can crush the pipe if something gets clogged in your system or if you start the system with the all of the blast gates closed (we will discuss those later).
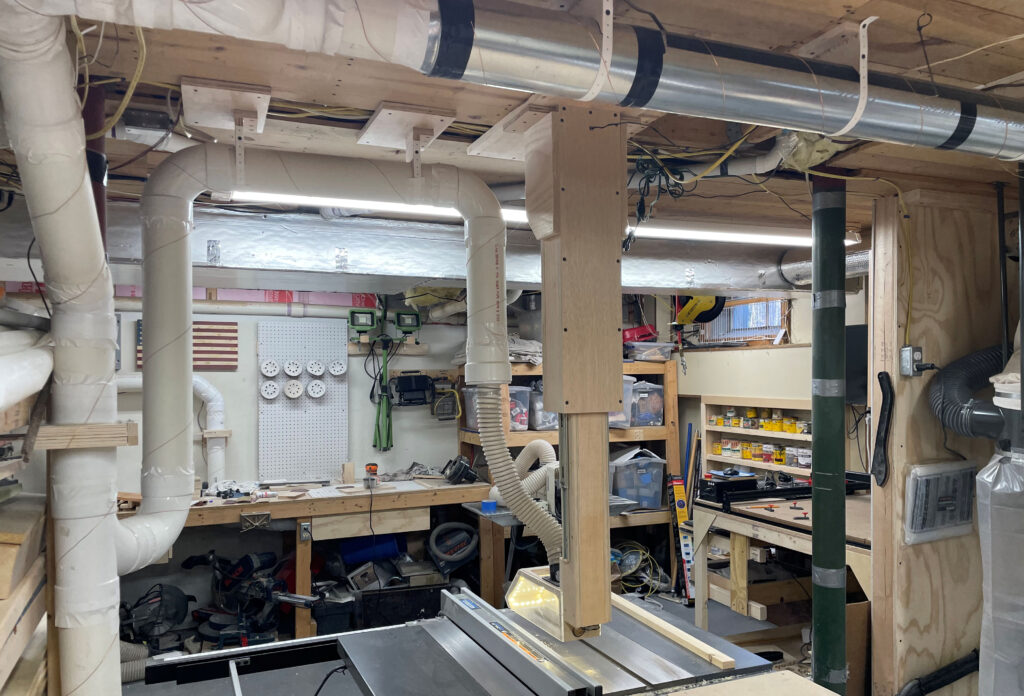
General View of Piping
I purchased the pipe from a local HVAC/plumbing supply company as the metal available from the big box stores is too light. FYI, larger gauge numbers mean the metal is actually thinner (pretty intuitive isn’t it?). Once the main trunk started to spread out through the shop, I went with 4″ PVC sewer pipe from Home Depot or Lowes. This is much less expensive than the steel pipe and far easier to install.
The pipes were taped together with duct tape to allow for future additions/changes. I made plywood brackets cut to the shape of the pipe to hold the piping against my ceiling. Plastic plumbing strapping held the piping to the brackets.
Blast gate (Homemade Versions)
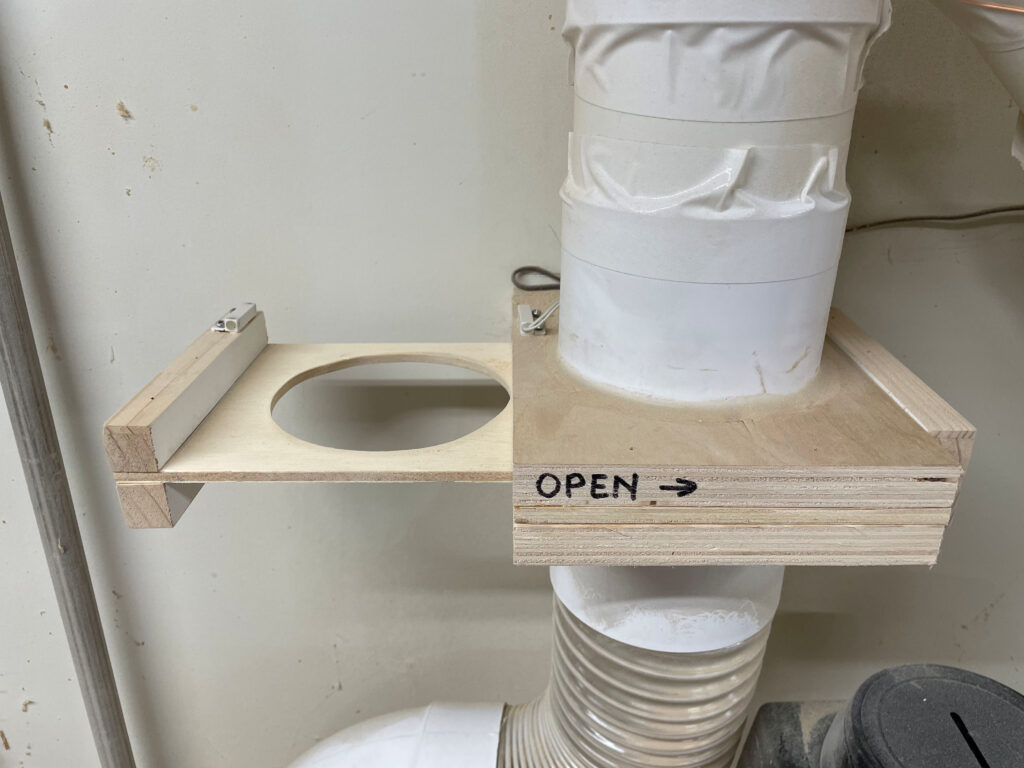
Homemade Blast Gate
As the tentacles of the system dispersed throughout the shop, I needed a way to control the air flow from each piece of dust generating equipment. If each piece of equipment is left constantly connected, there would not be enough suction to pull the sawdust from the piece of equipment actually generating the sawdust. Blast gates are used to control the air flow. While I could have purchased blast gates, I am a little too cheap for that and besides, what’s the fun in that? My blast gates were made from plywood and pine with male sewer pipe and female couplings that were attached with screws and sealed with silicone. The piece of wood separating the top and bottom pieces of plywood is just slightly thicker than the slide. The gate is designed such that when it slides in an out it keeps debris from accumulating at the gate. 4″ flexible tubing and 4″ clamps were used to make most of the final connections to the equipment.
Blast Gates (Purchased)
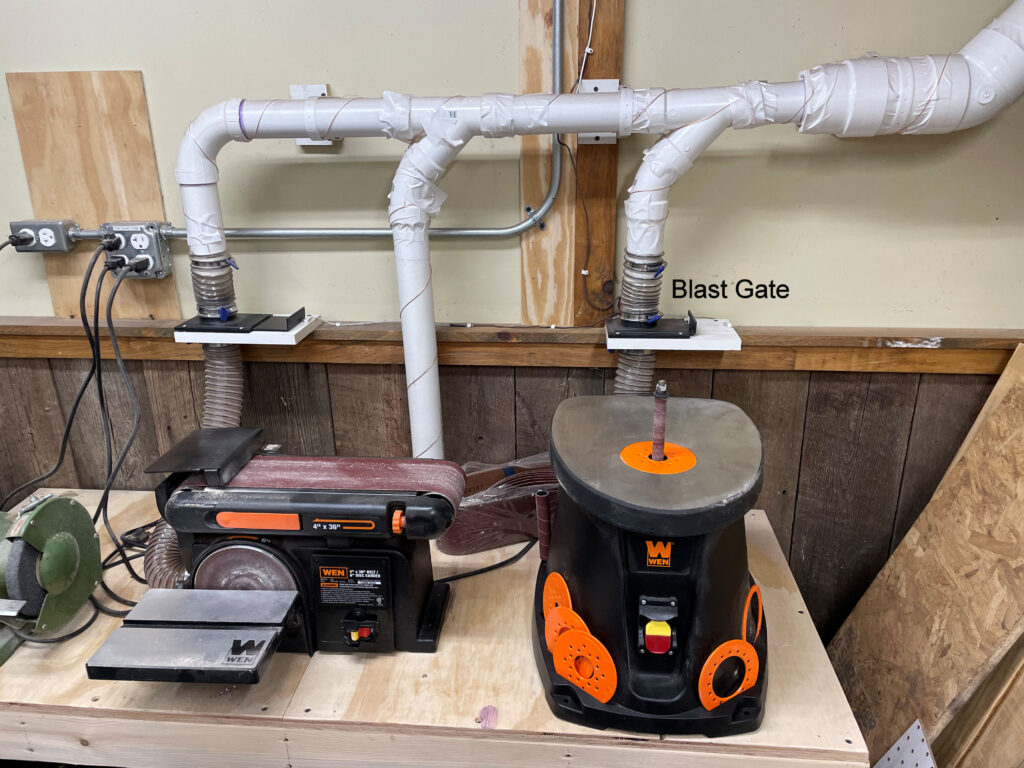
Sanders connected through purchased blast gates
For some of my smaller equipment that came with dust collection I did purchase some off-the-shelf blast gates. These were piped in with 2-1/2″ tubing and 2-1/2″ clamps given the smaller dust collection ports already integrated into each of the devices. For the smaller feeds I used standard PVC and eventually sized it up to the 4″ sewer pipe.
Equipment Connections
Example of Homemade Connection
My newer equipment had built in dust collection ports. That meant adapting the 4″ sewer pipe to a flexible hose to allow for connection to the factor supplied or homemade dust collection port. Quite a few pieces of my equipment are older and did not come with dust collection ports. That meant devising the means to collect the dust from the equipment at the point of dust generation without affecting the operation of the equipment.
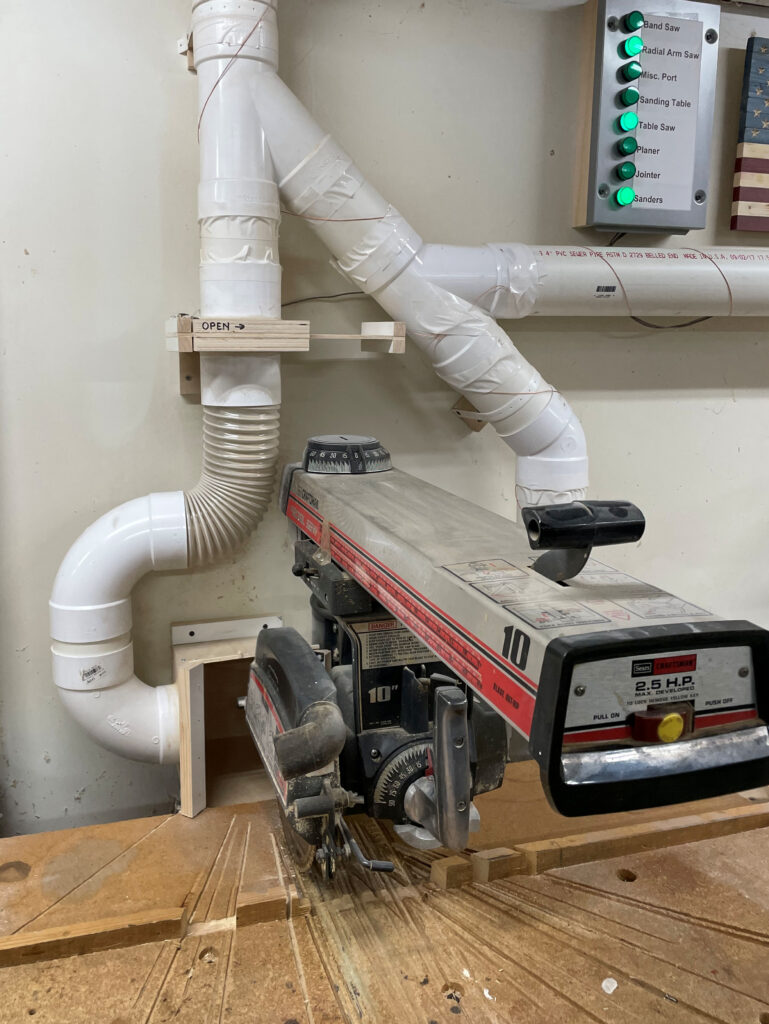
I still occasionally use a radial arm saw (enough with the snickers) and the existing dust port on it is a joke. I placed a collection port at the back of the table to catch the dust and it works very well. There are multiple fittings available to adapt your hoses to your homemade dust collection boxes.
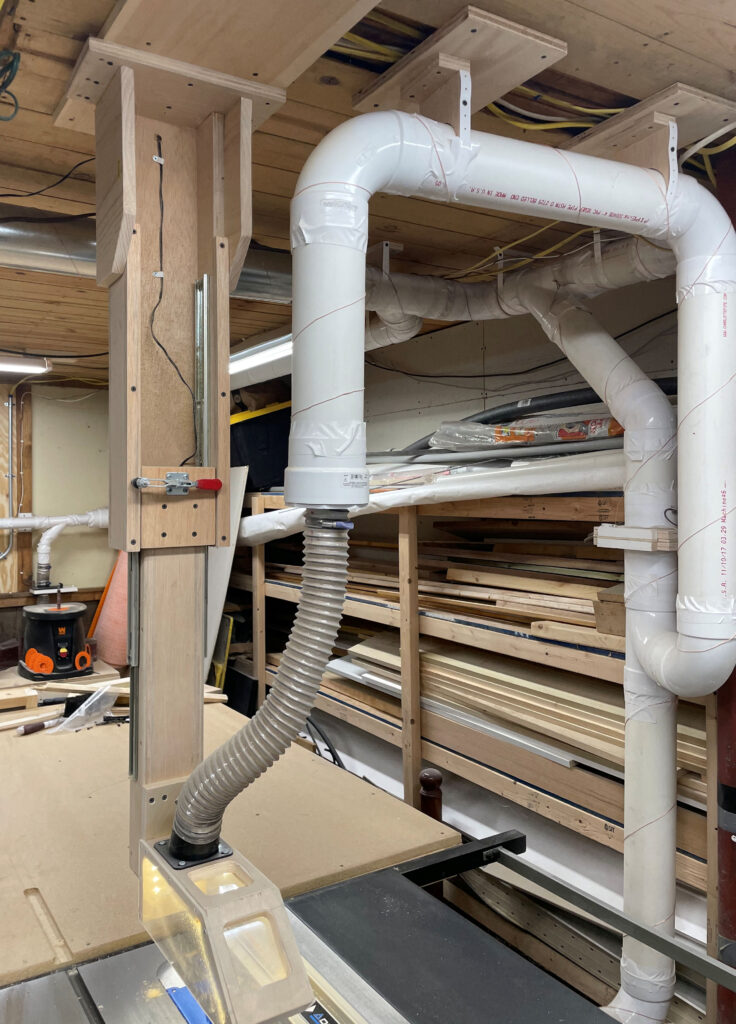
Table Saw Top Dust Collection
My table saw has a dust collection port under it but there is still quite a bit of dust generated off of the top of the table so I made an adjustable port that also sucks sawdust from the top of the table. The slide allows me to adjust it for the general thickness of the wood or to get it totally out of the way for certain cuts or changing blades.
Static Control
Static Control Ground Wire
One of the side effects of gathering dust is static electricity. Anyone who ever used a shop Vac to suck of drywall dust knows exactly what I am talking about. In larger systems this can be dangerous as a spark in the right mixture of dust can cause a flash fire.
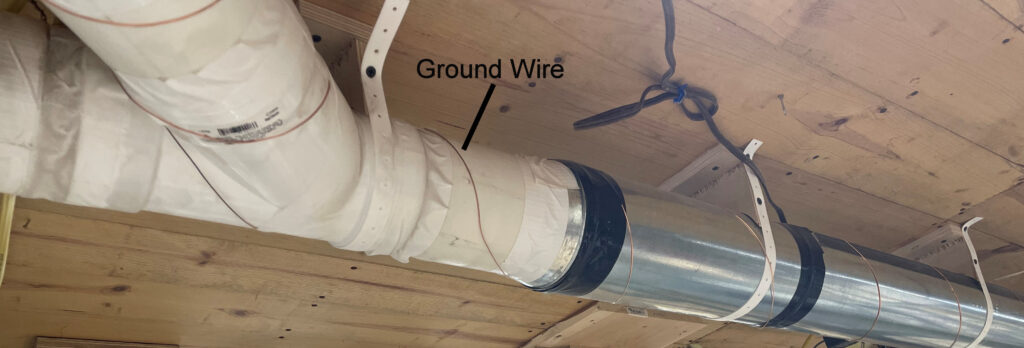
While I was unable to find an example of that in a smaller shop system like mine, I nevertheless decided to try to control the build-up of static electricity. As you may recall, my main truck started with steel pipe. Besides providing a solid trunk to handle the vacuum generated by the system, It also gave me a place to ground the incoming pipe. Once the system went to plastic, used 18 AWG bare copper solid wire to wrap all of the piping system including the metal trunk pipe. I left extra wire at locations where multiple pipes came together and taped the wire to the pipe every so often. That wire was then grounded to the house ground at the receptacle supplying power to the system. I have not experienced any issue with static electricity.
The “Christmas Tree”
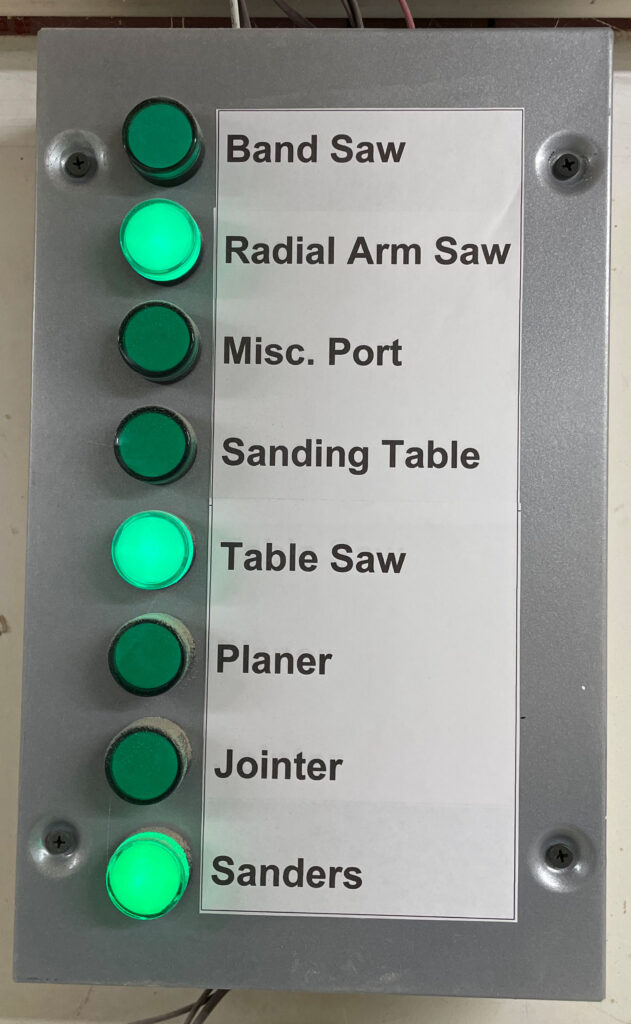
Open Blast Gates Panel
The next two add-ons to the system tend to expose my geeky side. This “Christmas Tree” or blast gate indicator add-on was a way to know which blast gates were open at any one time. As previously mentioned, when too many gates are open, the air flow from the device generating the dust can be impaired. With blast gates spread throughout the shop, I wanted a quick way to see what gates were open.
Each blast gate has a surface-mount magnetic contact switch from Amazon attached to it. When the blast gate is open, the magnet closes the contacts of the switch. Those contacts supply low-voltage power from a plug-in power pack to a light indicator that sits on a panel centrally located in my shop. I used 24 VDC but you could use 12 VDC if you source 12 VDC lights and a power supply. Each light is identified according to the gate it is monitoring. A simple glance shows me which gates are open at any time. While not quite as elegant as automatically opening and closing gates, it sure was much less expensive to put in place. The power supply for the panel is plugged into my shop light circuit such that when I shut off the shop lights, the power supply is also turned off. While this is low voltage, make sure you are comfortable with how to wire this before attempting it.
Dust Collector Control
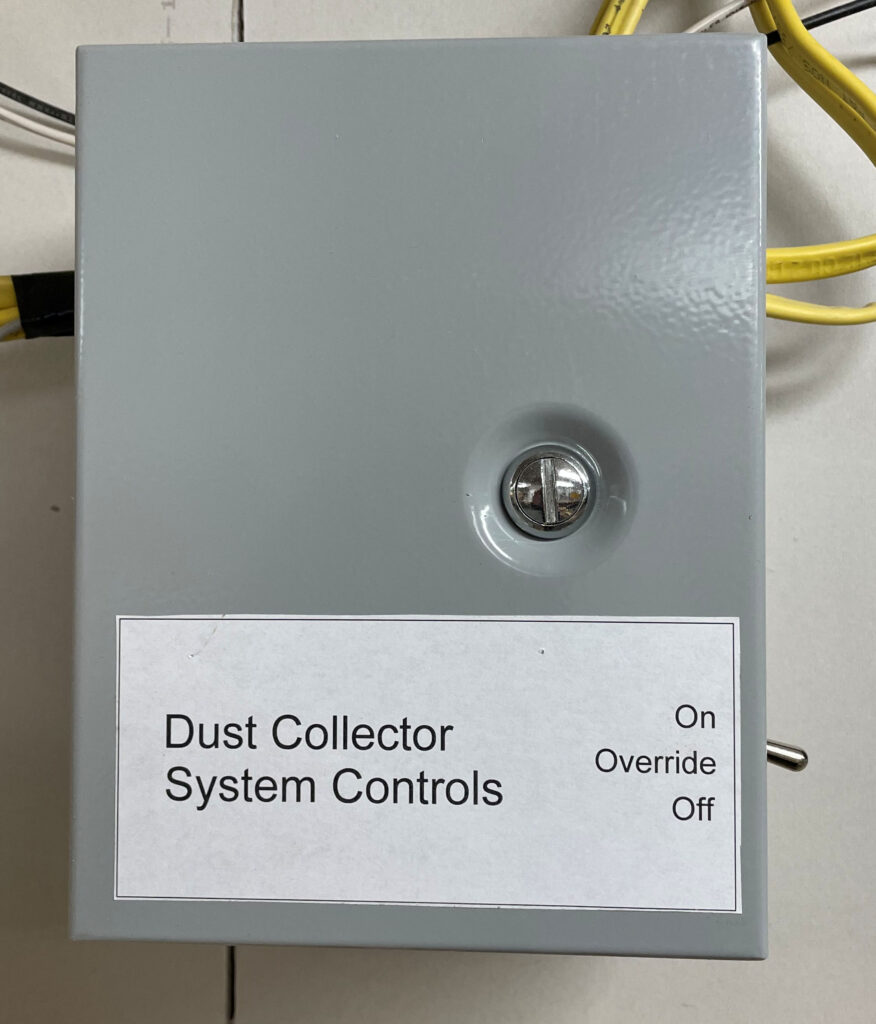
Dust Collector Control Box
As I researched what folks were installing for controls, I found quite a few were using remote controls to turn their system on and off. While I found that better than a switch to turn the unit on and off, I was less than fond of the extra 2 steps to control the unit much less constantly looking for that little remote control. Get serious, I can’t keep track of the remotes for our TVs much less one in my shop.
With my initial engineering background in electronic engineering, I decided to develop a box to automatically turn the Vac on and off when a piece of equipment connected to it was switched on and off (I warned you this we going to be geeky). I purchased a current sensor, as well as a box, some capacitors, and a power supply. I already had a relay, switch and terminal block (shocker, right?) but you can get equivalent parts on Amazon. I assembled the box and rewired my shop so that any equipment that would be supplying dust to the Vac system was on the same dedicated 20A circuit. I almost never have 2 of these pieces of equipment running at the same time so this presents no overload issues for the circuit.
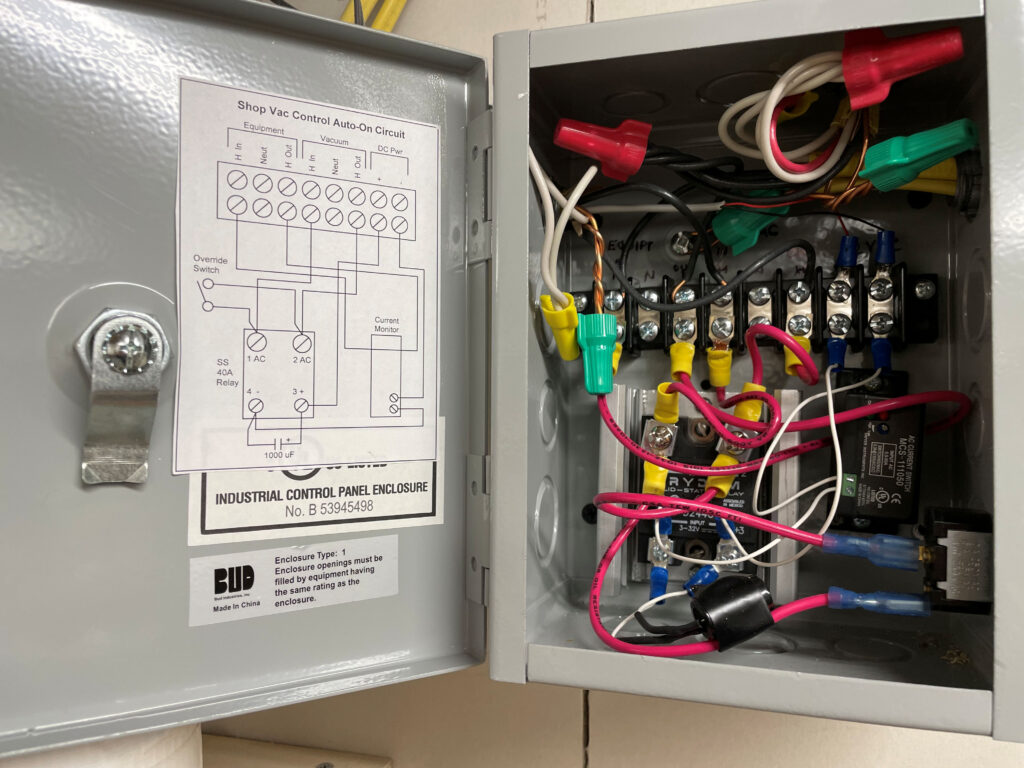
Dust Collection Control Box Interior
The current sense relay was adjusted to sense there was current flowing through the line (as it would when one of these pieces of equipment is turned on). The relay in the current sensing device switched the 12 VDC from the little power pack to turn on the SS relay. The SS relay supplied AC power to the Vac system. Given I wanted the Vac system to run 5-10 seconds after the equipment shut off, I placed an electrolytic capacitor across the DC input of the SS relay (sorry but don’t recall the value). That capacitor slowly discharges after the current sense relay shuts off which kept the SS relay supplying power to the Vac for an extra 5-10 seconds. That was plenty of time to clear out any sawdust already making its way to the dust collections system. As an extra precaution, the 12 VDC supply that powered this controller was plugged into my overhead light so that when the lights are shut off, so is the power supply keeping the system from accidentally turning on the Vac system. I would recommend not trying this part of the install unless you have some serious electrical experience.
Performance
The best measure of any device or system is how it performs the required task against the initial expectations. I can honestly say that this system surpasses my expectations. There have been times when I have forgotten to open a blast gate or for some reason had unplugged the dust collector motor and used a piece of dust generating equipment. I instantly notice the dust being generated in the air. Every time that happens I wonder how I went so long without introducing dust collection into my shop? That leads to my only regret and that is that I did not do this years ago!
Leave A Comment