
Shop Cleanup
While creating projects in the shop is typically loads of fun, I find the clean-up of the aftermath not quite as entertaining. I think it is true for most of us that making the mess is much more fun than cleaning it up. I have had my share of Shop Vacs and have found them to be pretty good at the onset and less than great as their filters begin to clog up. Cleaning those filters is an absolute mess and buying them is not cheap (much less you never seem to have one on hand when you realize that you need one). Then there is the entire cord thing and trying to wheel that beast around the shop with the wheels constantly getting caught in the cord. Let’s face it, the hose and Vac accessories to sweep the floor supplied with Shop Vacs are not exactly the best either.
Use our Central Vacuum System?
I installed a Central Vac system in our house as soon as we moved in. We had the unit in our previous home and part of the deal was that the actual Vacuum unit was not part of the sale. Yes, we have confirmed I am “thrifty” at times. These systems have suction like you cannot believe and given the nature of the design, they do not clog as they do not have filters. They work with a cyclone effect with the dirt being spun into the collection unit and the somewhat clean air being blown out of the house through an outside port. No filters! I considered simply hooking up an additional inlet port to our existing central vacuum system. However, as I thought further about that, I knew that the somewhat small collection container in the vacuum unit would be quickly filled with my sawdust. My wife is rather fond of keeping our house clean and I am rather fond of eating so I surmised that basically disabling her central vacuum system by overwhelming it with my sawdust may impact my source of good food. Hence, I abandoned the idea of directly using our central vacuum system.
The Best of Both Worlds
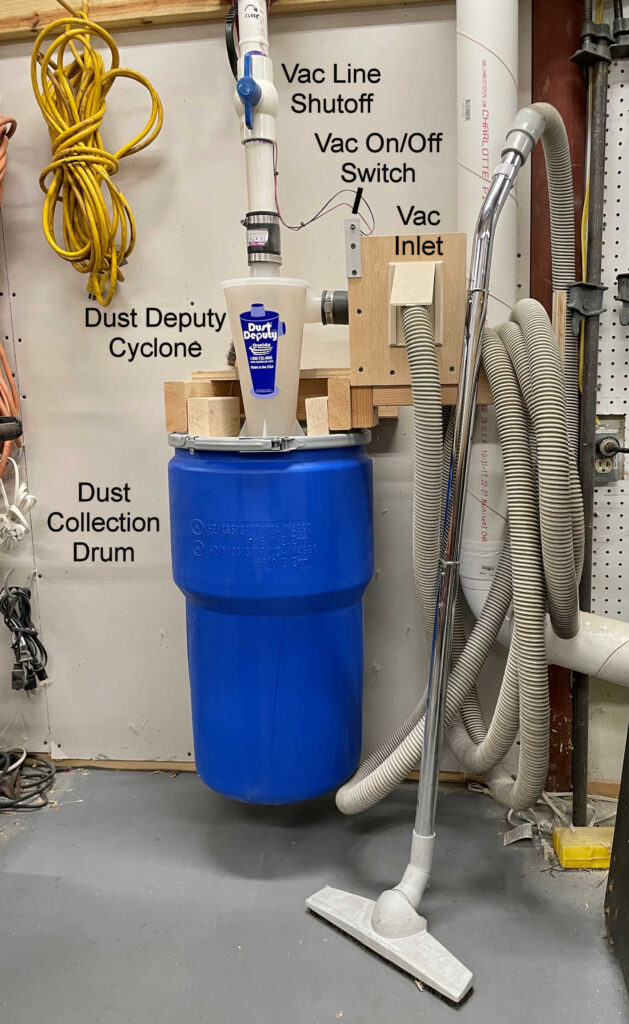 I decided to use the power of our Central Vacuum system but with my own system to collect the sawdust from my shop. The existing Central Vac system provides the vacuum needed for the system. I was able to connect directly into one of the central vacuum system suction lines that I ran through the basement (my shop). These lines are a different size than standard PVC. I source my lines and fittings from a central vacuum dealer in my area. The line from the existing system was converted to 1-1/2″ PVC through the use of a 1-1/2″ rubber coupling. From there we go to a 1/4 turn shutoff gate (you can get these at Home Depot or Lowes). I decided to put this in the system so that I did not need to constantly unplug my hose and so that I could shut off access to my collection drum so as not to turn it into a prune if the system was not allowing flow through the hose on my end (more on that later).
The system then connected into the top of the dust deputy cyclone (the outlet of the dust deputy). These seem like a lot of money for a piece of plastic, but I can assure you that they are worth it. The bottom of the dust deputy (where it dumps the dirt) was attached to the lid of my 14 gallon poly drum. This drum has a removable lid that is held in place with a metal band. Before attaching the dust deputy to the top of the drum lid I cut a hole in the lid the same size as the hole in the bottom of the dust deputy.
The inlet of the dust deputy was attached to the inlet port for the central vacuum hose through another 1-1/2″ rubber coupling. We were ready for a new vacuum hose for our house unit as the on/off switch wiring in that hose was shot. That made it inconvenient for cleaning the main house (I know, the traumas in life), but that would not be an issue for my setup. That meant I got the hose for my system by simply buying a new hose for my wife to use for her cleaning (we call that a win/win). If you aren’t that lucky these vacuum hoses and accessories are somewhat reasonable to buy in long lengths and far better than dealing with crummy plastic hose that comes with Shop Vacs. Just make sure that the hose you buy is compatible with the inlet port you buy.
To control the system I placed a simple miniature on/off switch near the inlet port which was tied into the low voltage lines for the central vacuum system. I made a wooden fixture to support the lid as well as the cyclone and also used that as a hose holder.
Performance
The system works great. I put no sawdust into the collection drum of the central vacuum system and enjoy the benefits of having the exhaust air leave my shop. Given the strength of the suction of the central vacuum system, I did need to make a minor modification to the lid of the dust collection drum. I found that if I had a clog the hose or forgot to first attach the hose, the system had sufficient vacuum to turn this somewhat heavy plastic drum into a prune. I played around with several ideas for reinforcing the drum but in the end added a check valve in the lid of the drum with a spring that will only open if the hose is not attached or the unit is clogged. While I also have a different central dust collection system for my main dust generating equipment (a different article on this site), I find this thing is great for cleaning up the floors as well as the dust that just doesn’t make it into my main dust collection system.
An Alternate to the Central Vacuum System
If you are not as fortunate as we are to have a central vacuum system (you really should get one as they are great and you may score some huge points with your wife), you can use a shop Vac to generate your vacuum. I have seen plenty of setups where the shop Vac is used to pull the vacuum needed. You can either mount the entire arrangement on a cart or stay with this type of stationary setup. This will prevent those filter clogs in your shop Vac. Enjoy your cleanup!
Leave A Comment